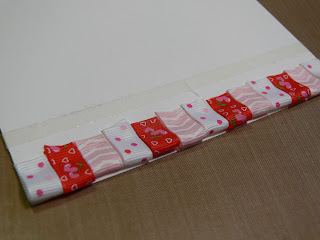
First, I chose a previous month's Really Reasonable Ribbon Club Assortment (January 2012) and used some of the printed ribbon scraps that I had left. I LOVE how all of the ribbons in the assortment go together so I don't have to spend time choosing what will work with what. I decided to use all grosgrain, although you can mix and match ribbon styles and widths for fun textures.
Start with your card layer and Scor-Tape. I use the 1/4" for the grosgrain. Add a piece of tape the width of your card, and just high enough for the length of loops you want to make. My bottom row of loops were approximately one inch long, so I adhered the tape about half an inch up from the bottom of my card panel.
Add a second row of tape for the second row of loops. The second row of loops were about 1 1/2" long. I didn't measure any of this, just eye-balled it!
Begin with your smaller cut loops and adhere them to themselves using Glue Dots, then to the bottom row of Scor-Tape, folding in half.
Continue adding loops across the entire bottom row of Scor-Tape.
Add the second row of longer loops.
I alternated the ribbon patterns as I went. Finish off with a length of ribbon of one of your patterns, using Scor-Tape to adhere.
Add your desired design to the rest of the card. My sentiment is from In and Out You by Flourishes, available at i {heart} papers. I stamped it on Ultra Smooth Premium White CS using Rose Bud Memento ink. I added Kaiser Pearls to the corner for a little pop of bling. All done!
I hope you will try this very easy, fun, loopy design!
What do you think? I think my mom will love this for her birthday this month!
Card Makin' Mamas - Ribbon
CAS-ual Fridays - Birthday Project


Beautiful card. Tanks for the tutorial I will be giving this a try.
ReplyDeleteHave a creative day.
Hugs Nana
♥ My Crafting Channel ♥
♥ 2 Creative Chicks ♥
This is totally awesome! Thanks for sharing the tutorial - it's already got my cogs turning!
ReplyDeleteFabulous Judy!
ReplyDeleteI've always loved the look of ribbon loops on a card & keep SAYING I'm going to add some to one of my cards. Thanks for "re"inspiring me to actually do it with your fabulous version! Love this!!
Awesome, Judy!! Hugs-LORi
ReplyDeleteLove your card!Very pretty!Thanks for the tutorial..
ReplyDeleteCUTE CUTE CUTE!! Super fun idea with the ribbons, Judy! And thanks for the tutorial too!
ReplyDeleteVery fun tutorial, makes for a fun card design.
ReplyDeleteRegards diane
Wow! Your loopy ribbon trime is so cute! I love the way you did the hearts too! Thanks so much for playing along with our Birthday Bash at CAS-ual Fridays!
ReplyDeleteWhat a unique card idea - thanks for sharing. This has really inspired me and I plan to use it in the mini album I'm doing for my DGGD.
ReplyDeleteI saw this card while on the CAS-ual Fridays blog and had to get a closer look - love the layered ribbons. Thank-you for the tutorial - I am so going to try this!
ReplyDeleteWhat a cute idea with the ribbons!!! Cute card.
ReplyDeleteI am a big fan of Flourishes - Congradulations on joining the team. I am origionally from Nebraska - down near Fremont. My DD will be going to U at Lincoln this fall.
Have a great Mother's Day!!!